
The audiophile world has long treated switched-mode power supplies as the enemy — noisy, compromised, something to be tolerated in budget gear but never trusted where sound quality matters. Browse almost any forum thread about powering a DAC or headphone amp and you’ll find the same orthodoxy: linear regulators only, toroidal transformers preferred, massive filter banks mandatory, and cheap SMPS strictly forbidden.
But this reputation isn’t entirely warranted. With carefully chosen filtering components, a basic understanding of where noise actually lives, and some layout discipline, a quality laptop brick can deliver surprisingly clean rails to an audio circuit. The noise produced by SMPS is largely predictable and filterable.
This article is about repurposing the laptop brick as an audiophile-quality supply. We’ll look at where SMPS noise comes from, why it’s more manageable than its reputation suggests, and what simple measures let you extract genuinely clean power from a supply that most audiophiles would throw in a drawer.
If you are impatient, feel free to jump straight to the results.
What You’ll Need
Consumables. Wick, flux, etc (AliExpress | Amazon)
0805 SMT Resistors Kit (AliExpress | Amazon)
TIP32C PNP Power Transistors (AliExpress | Amazon)
SMT Aluminium Polymer Capacitor Kit (AliExpress | Amazon)
0805 SMT MLCC Capacitors Kit (AliExpress | Amazon)
5.5×2.1mm PCB Mount DC Socket (AliExpress | Amazon)
The EasyEDA project (schematic + pcb) if you want to order your own PCB (BSD License)
Understand the enemy
The first thing we’re going to do is have a close look at the noise of several laptop PSUs. I selected three from my junk drawer and applied a 1 kΩ load to simulate audio gear at idle. Light loads are typically the worst-case for switching noise.
I then captured the output from all three bricks:


The noise profiles of all three are relatively similar, and share a common feature: repetitive bursts of high-frequency oscillations, typically centered around 20 MHz.
We’ll now focus on Brick 3, which had by far the highest switching noise of the three with noise at ~600 mVpp — a useful worst-case to design against. Taking a more detailed capture:

From the detailed capture, the bursts repeat at 4.7 kHz — right in the audio band. This is lower than you might expect from an SMPS, but at light loads most modern controllers deliberately switch into burst mode to maintain efficiency, trading a higher switching frequency for short, periodic packets of switching activity.
We’ll now zoom in all the way and take a capture of a single burst:

The burst lasts just 1 µs and contains oscillations ranging from roughly 2 MHz to 20 MHz — a broad spread of high-frequency energy.
Let’s take an FFT of a single burst:

The majority of the noise is centered around 17 MHz, spreading roughly 5 MHz either side and falling off quickly above 22 MHz.
Less is Sometimes More
This high-frequency noise is exactly why SMPS supplies get such a bad reputation among audio builders — and why many well-intentioned filtering attempts fall short.
When I first started experimenting with these supplies, my instinct was the same as everyone else’s: bigger inductance, bigger capacitance, more filtering.
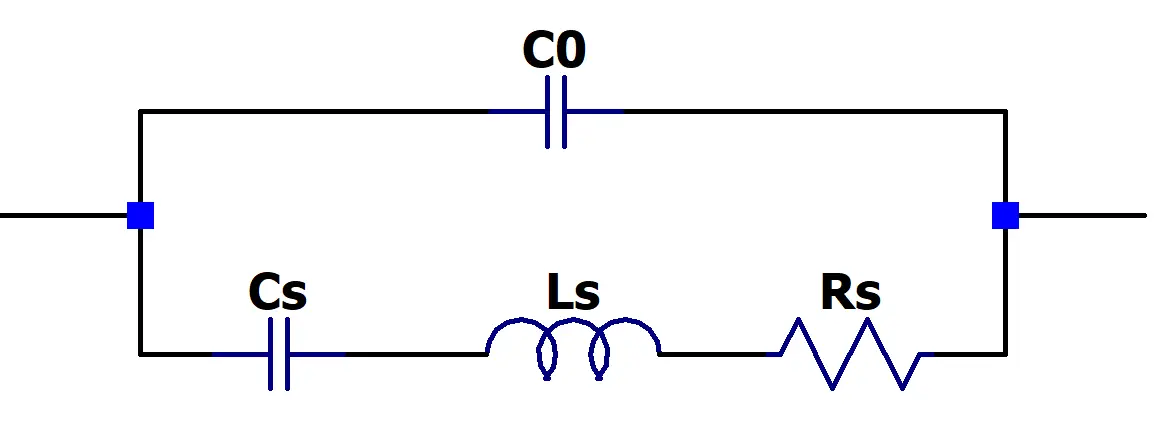
The problem is that an inductor doesn’t just provide inductance — it also has a parallel capacitance, formed between individual windings. The more windings, the greater the inter-winding capacitance, and the lower the frequency at which that capacitance takes over. Above this self-resonant frequency, the inductor stops behaving like an inductor entirely and starts looking like a capacitor. At 17 MHz, a poorly chosen inductor isn’t filtering anything — it’s just a capacitor in series with your supply rail, allowing high-frequency noise to pass straight through unimpeded.
The same is true of capacitors: larger values generally imply more internal structure, increasing parasitic inductance, and beyond a certain point they can no longer effectively shunt noise to ground.
Closing In On A Solution
Now that we have a clearer understanding of the challenges, we can begin to develop an effective solution. One key insight is that it won’t be possible to eliminate all noise using a single filtering stage. Instead, a two-stage filter design is required.
The first stage will target the highest-frequency noise, while a second stage will handle lower-frequency components.
This approach targets differential-mode noise present on the supply rails. Switching supplies can also generate common-mode noise through parasitic coupling across the isolation barrier — a separate problem not addressed by a simple LC filter.
In applications where this becomes an issue, a common-mode choke placed at the output of the SMPS can be used to attenuate it before it enters the rest of the system. In my testing across several grounded systems, however, I didn’t encounter any practical issues attributable to common-mode noise, so no additional filtering was required.
First Stage
For the first stage, we’ll use a low-pass LC filter topology, with careful component selection being critical to overall performance.
Inductor Selection
The inductor must maintain good performance well beyond 22 MHz while handling the required load current without saturating. More inductance isn’t always better here — as we established earlier, a larger inductor brings more inter-winding capacitance and a lower self-resonant frequency (SRF), which can undermine filter performance entirely at high frequencies.
A promising option is the TDK SPM6530T series of shielded power inductors, offering inductance values from 0.25 µH to 10 µH with saturation currents ranging from 28.5 A down to 3.8 A.
| L (µH) | Tolerance | L Measuring Frequency (kHz) | DC Resistance (mΩ) max | DC Resistance (mΩ) typ | Isat (A) typ | Itemp (A) typ | Part No. |
|---|---|---|---|---|---|---|---|
| 0.25 | ±20% | 100 | 2.31 | 2.10 | 28.5 | 23.0 | SPM6530T-R25M230 |
| 0.47 | ±20% | 100 | 3.63 | 3.30 | 20.5 | 20.0 | SPM6530T-R47M170 |
| 0.56 | ±20% | 100 | 3.63 | 3.30 | 20.5 | 20.0 | SPM6530T-R56M |
| 0.68 | ±20% | 100 | 5.39 | 4.90 | 16.6 | 16.0 | SPM6530T-R68M140 |
| 1.0 | ±20% | 100 | 7.81 | 7.10 | 14.1 | 13.0 | SPM6530T-1R0M120 |
| 1.5 | ±20% | 100 | 10.7 | 9.70 | 11.5 | 11.0 | SPM6530T-1R5M100 |
| 2.2 | ±20% | 100 | 19.1 | 17.3 | 8.4 | 8.2 | SPM6530T-2R2M |
| 3.3 | ±20% | 100 | 29.7 | 27.0 | 7.3 | 6.8 | SPM6530T-3R3M |
| 4.7 | ±20% | 100 | 39.4 | 35.8 | 6.2 | 5.6 | SPM6530T-4R7M |
| 6.8 | ±20% | 100 | 53.3 | 48.4 | 4.0 | 4.0 | SPM6530T-6R8M |
| 10 | ±20% | 100 | 72.5 | 65.9 | 3.8 | 3.6 | SPM6530T-100M |
The higher inductance values in this series have saturation currents approaching the ~5 A output of a typical laptop supply, leaving insufficient margin, so we can immediately narrow the field to the 0.25 µH to 2.2 µH variants.
Next, we evaluate the high-frequency performance:

The frequency characteristics chart allows us to narrow the field further. The 2.2 µH inductor’s inductance begins rising in the 20–30 MHz range — a sign that it is approaching its SRF (Self Resonant Frequency) — which rules it out.
The 0.47 µH inductor, by contrast, remains stable to around 40 MHz with an SRF of approximately 90 MHz, giving us comfortable margin above our 22 MHz target. There is no strong justification for going smaller than this, which rules out the 0.25 µH option.
This leaves us with the 0.47 µH, 0.56 µH, 1.0 µH, and 1.5 µH inductors, all of which are likely to meet our requirements. Lower inductance values tend to favor higher current handling and better high-frequency performance, while higher values may provide improved noise attenuation at lower frequencies.
Corner frequency calculations showed that 0.47 µH was already sufficient for our target filter response, and a lower inductance value means lower DC resistance and less voltage drop under load — so the 0.56 µH and 1.5 µH were set aside. At just 14 cents each, I ordered both the 0.47 µH and 1.0 µH for evaluation.
Capacitor Selection
The capacitor selection is guided by three requirements: low impedance at 22 MHz, sufficient capacitance after DC bias derating, and a package size appropriate for high-frequency use.
For package size, 0805 is a reasonable choice at these frequencies — smaller packages have lower parasitic inductance, but 0805 strikes a good balance between high-frequency performance and ease of hand soldering.
Murata’s SimSurfing tool is invaluable here, providing DC bias derating curves and impedance plots for every part in their catalogue. The selected part is the Murata GRM21BR61H106KE43L — a 10 µF, 50 V, X5R capacitor in 0805.
SimSurfing reveals two important characteristics of this capacitor. First, the DC bias derating is significant — at 19 V the nominal 10 µF drops to just 1.7 µF. This is a property of multi-layer ceramic capacitors (MLCC) that often catches builders off guard: unlike film or electrolytic types, MLCCs lose capacitance as the DC bias voltage increases.

Second, the self-resonant frequency is at 2 MHz, where |Z| reaches a minimum of 0.004 Ω. By 22 MHz the capacitor is behaving inductively and |Z| has risen to 0.05 Ω.

That last figure might look alarming, but context matters. At 22 MHz the inductor presents around 50–60 Ω of impedance, making the capacitor’s 0.05 Ω utterly negligible by comparison. The filter is still working effectively even though the capacitors are operating above their SRF.
To address the DC bias derating, six capacitors are placed in parallel. This recovers the nominal capacitance — 6 × 1.7 µF = 10.2 µF at operating voltage — which keeps the math simple and, as a bonus, paralleling capacitors reduces the effective ESL and pushes the combined SRF higher. The PCB layout leaves pads for all six in parallel, with room to experiment with overlapping or decade values if desired.
Corner Frequency
With component values finalised — 0.47 µH and 10 µF effective capacitance after DC bias derating — we can verify the corner frequency:
What we actually care about is the attenuation at 17 MHz, where the bulk of the switching noise’s energy resides. A second-order LC filter rolls off at 40 dB per decade:
With 17 MHz sitting 2.37 decades above the corner frequency, the attenuation is:
2.37 × 40 dB ≈ 95 dB.
That is a substantial amount of rejection. The residual low-frequency envelope of the switching bursts is left to the second stage to handle.
Schematic

First Stage: High Frequency LC Filter
L1 and C1–C6 form the low-pass filter. Layout matters here — the capacitors must sit as close as possible to L1 and have a solid ground connection, achieved with generous via stitching.
The six capacitor pads allow experimentation to validate which combination of values gives the best filtering performance.
Second Stage: Active Filter
The second stage can be implemented in several ways — a conventional linear regulator is the natural choice for most builds. In my design, I used a capacitance multiplier instead, for a few reasons specific to this application:
- The filter bandwidth is adjustable.
- The circuit acts as a filter rather than regulating to a fixed output.
- Multiple output stages can be paralleled easily for higher current capacity.
However, by using a capacitance multiplier I’ve introduced a potentially bigger issue — this circuit has no thermal or over-current protection. A short circuit or sustained overload will push the Sziklai pairs into a condition where they are dissipating significant power with no way to limit it. In a linear regulator this is handled internally; here, it falls entirely to the system designer.
If your load is well-characterized and benign, this may not concern you. If there is any risk of a short or fault condition, a fuse on the input is the minimum precaution — a fast-blow type rated just above your maximum expected load current.
Thermal management deserves similar attention. The Sziklai pairs will dissipate power equal to the voltage drop across them multiplied by the load current. At higher currents this can become substantial, and the transistors must be mounted to adequate heatsinks. Paralleling additional output stages distributes this dissipation, which is one of the practical advantages of the topology.
R2 and C11 form an RC filter providing a stable reference voltage that feeds one or more Sziklai pair emitter followers. The cutoff frequency of the RC network is:
1.46 Hz — an extraordinarily low corner frequency — essentially DC.
Each Sziklai pair includes a small ballast resistor (R1) to improve load sharing between multiple pairs, and a base resistor (R3) connected to VCC to improve turn-off time by providing a path for current to flow into Q2‘s base.
The Sziklai configuration is chosen over a single power transistor for two reasons. First, the increased composite beta means significantly less current is drawn from the RC reference network, preserving the stability of the reference voltage that the filter’s performance depends on. Second, Sziklai pairs have only a single (~0.7 V) base-emitter drop, while a Darlington has two (~1.4 V total). This reduces the voltage drop across the output stage, which reduces dissipation and leaves more of our initial voltage available at the output.
Results
I ordered a PCB from JLCPCB and populated it with the component values calculated earlier. A single heatsink spans all three output stages, thermally coupling them together to improve load balancing.
The filter as built can handle up to 5–6 A (approximately 100 W at 19 V), with a voltage drop of just 0.9–1.1 V across the full load range — remarkably flat. At full load this corresponds to around 6–8 W of dissipation, or approximately 95% efficiency.


With the board assembled, it’s time to see how the filter performs in practice.
First, we take a capture before and after the first stage filter:


Before the first stage LC filter we observe a ripple of 584 mVpp, and after only 37 mVpp. An amplitude reduction of ~15×, an excellent initial result.
However, this amplitude isn’t the whole story. The real question is whether the high-frequency switching noise has been attenuated. Zooming in:

The high-frequency noise is gone. What remains are a few decaying oscillations at approximately 50 kHz — exactly the frequency range the second stage is designed to handle.
Finally, let’s examine the output of the final filter stage:

The output ripple is less than 1.6 mVpp, a reduction of over 300× from the raw 584 mVpp we started with.
The 1.6 mVpp shown here is the limit of what I’m able to reliably measure with this setup — with the probe shorted to its own ground I still read 1.6 mVpp, meaning the true output noise lies below this measurement floor. This noisy laptop brick has been repurposed for audiophile duty.
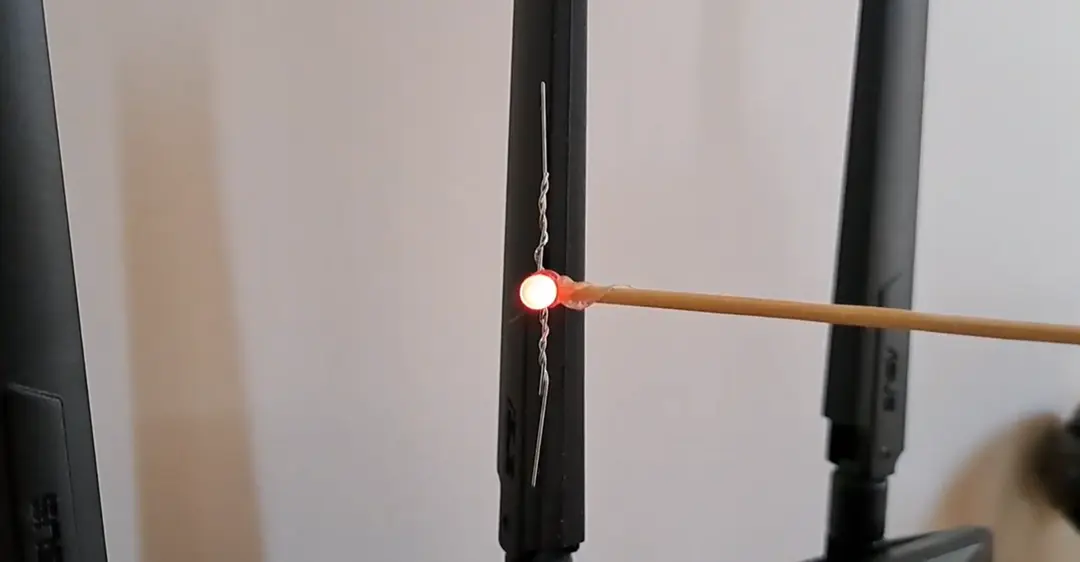
As they say, the proof of the pudding is in the eating. So as a final test I built a small one-transistor Class A amplifier and recorded the output when it was running on the laptop brick with and without the filter. You can listen to the results:


Leave a Reply